A flexible shawl, suitable for snuggling up on a cold winter's day, or covering the arms in the summer.
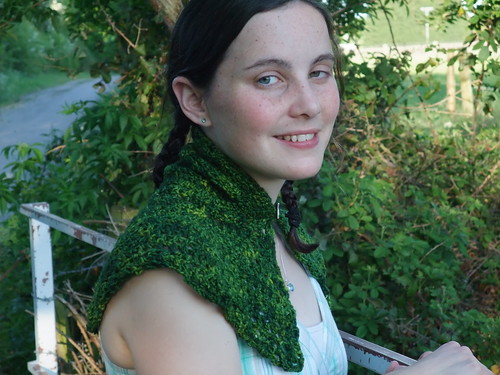 The example in the pictures was made under time-pressure, so acts as a small capelet or scarf, with the button anchoring the shawl in place. However, the pattern is expandable so that a larger shawl can be made, it could also act as a bolero if you sew up the underarms.
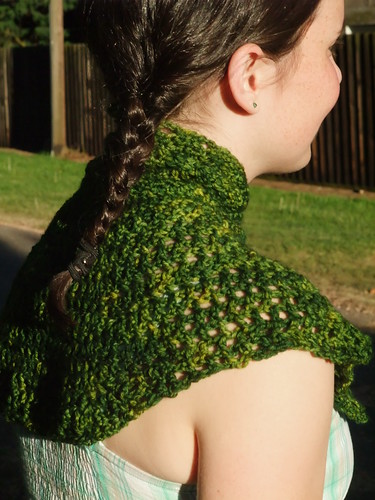
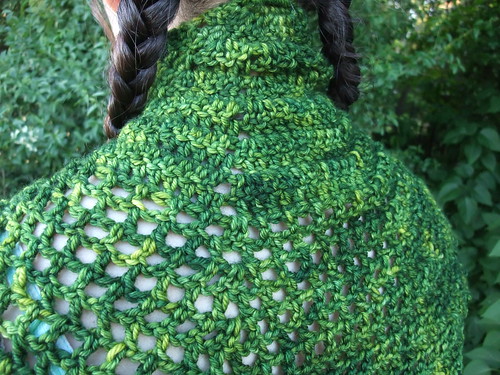
The shawl is made up of a dense stitch pattern at the top of the shawl, changing into a wider mesh pattern about halfway down.
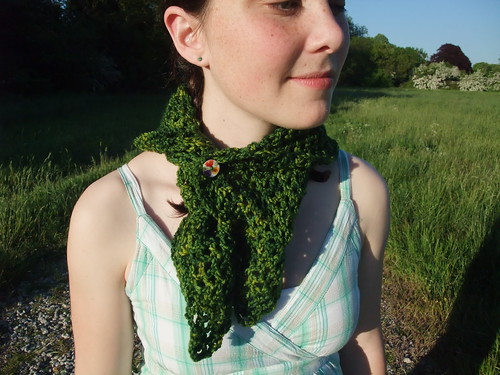
The shawl can be worn with the button fastened at the top, making it a capelet, or more casually, with the button fastening into the fabric of the shawl.

Heidi Shawl Pattern
Notions:
About 1 skein to 2 skeins of madelinetosh tosh DK in Jade (11wpi, 206 metres per skein). Pictured example used 1 skein.
5mm hook
Button
Needle to weave in ends and attach button
Pattern (uses US terms):
Special stitches:
Dc2tog: yarn over, insert in stitch, yarn over, pull over first loop, yarn over, pull through 2 loops on hook, yarn over, insert in next stitch, yarn over, pull over first loop, yarn over, pull through 2 loops on hook, yarn over, pull through all 3 loops on stitch.
The 3 ch at beginning of each round are counted as 1 stitch, as is each subsequent chain in pattern (so 3ch ch1 dc dc ch1 dc would be counted as 6 stitches). Chains in the first half of the pattern are counted as increases and should be stitched into in the next row (look at the loops from the previous row, not the stitches).
There are charts below the pattern for anyone who gets lost!
Dense pattern:
Row 1: magic loop, work 12 sc onto loop, and pull closed. Put finger in centre of loop so that it does not shut completely.
Row 2: 2 dc into first 6 stitches, turn leaving rest of stitches unworked (12 stitches)
Row 3: 3 ch, *ch1, dc into next 2 stitches*, repeat *to* 4 times, ch1, dc into last stitch, turn (18 stitches)
Row 4: 3 ch, *ch1, dc2tog, 2dc in chain space*, repeat *to* 4 times, ch 1, dc into last stitch, turn (23 stitches)
Row 5: 3 ch *ch1, dc into next 4 stitches*, repeat *to* 4 times, ch 1, dc into last stitch, turn (28 stitches)
Row 6: 3 ch, *ch1, dc, dc2tog, dc, 2dc in chain space* repeat *to* 4 times, ch 1, dc into last stitch, turn (33 stitches)
Row 7: 3ch, *ch1, dc in next 6 stitches*, repeat *to* 4 times, ch 1, dc into last stitch, turn (38 stitches)
Row 8: 3 ch, *ch1, dc in next 2 stitches, dc2tog, dc in next 2 stitches, 2dc in chain space* repeat *to* 4 times, ch 1, dc into last stitch, turn (43 stitches)
Row 9: 3 ch, *ch1, dc in next 8 stitches*, repeat *to* 4 times, ch 1, dc into last stitch, turn (48 stitches)
Row 10: 3ch, *ch1, dc in next 3 stitches, dc2tog, dc in next 3 stitches, 2dc in chain space*, *to* 4 times, ch 1, dc into last stitch, turn (53 stitches)
Continue this pattern of increases as long as desired, so that:
Even row: 3ch *ch1, dc in next (even number) stitches*, repeat *to* 4 times, ch1, dc into last stitch, turn (number8 stitches)
Odd row: 3 ch *ch1, dc in next (number of dcs in last odd row +1) stitches, dc2tog, dc in next (number of dcs in last odd row +1), 2dc in chain space*, repeat *to* 4 times, ch1, dc into last stitch, turn (number3 stitches)
Mesh pattern:
Row 1 (should come after an even row): 4ch,*dc, ch over next stitch* repeat *to* until reach ch space, 2dc in chain space, ch1, repeat this pattern until reach end. Do not do 2ch in final chain space but ch1 and then 1dc in last stitch, turn
Row 2: 4ch, *dc in top of previous row's dc, ch over previous row's chain* repeat *to* until reach previous row's 2dc increase – dc in first dc, ch1 and place marker over this stitch, dc in second dc, ch1, continue *to*, repeat until reach end, ch1, dc in last stitch, turn
Row 3: 4ch, *dc in top of previous row's dc, ch over previous row's chain* repeat *to* until reach marker placed in previous row – remove and 2dc in ch space, ch1, continue *to* and increases until reach end, ch1, dc in last stitch, turn.
Repeat rows 2 and 3 until desired length. There should be 4 places where increases are occurring.
Weave in ends. Sew button at the bottom of the dense pattern, or wherever is convenient for neck width.
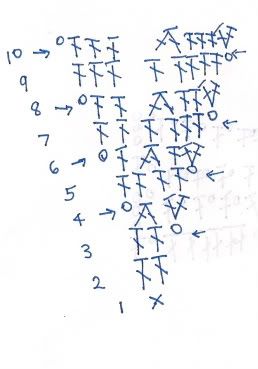
Charts:
This chart shows the *to* units of the dense pattern. The arrows show the direction of working.
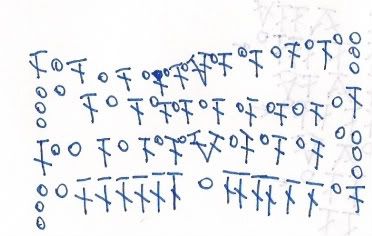
This chart shows the changeover from the dense pattern to the mesh pattern.
About 1 skein to 2 skeins of madelinetosh tosh DK in Jade (11wpi, 206 metres per skein). Pictured example used 1 skein.
5mm hook
Button
Needle to weave in ends and attach button
Pattern (uses US terms):
Special stitches:
Dc2tog: yarn over, insert in stitch, yarn over, pull over first loop, yarn over, pull through 2 loops on hook, yarn over, insert in next stitch, yarn over, pull over first loop, yarn over, pull through 2 loops on hook, yarn over, pull through all 3 loops on stitch.
The 3 ch at beginning of each round are counted as 1 stitch, as is each subsequent chain in pattern (so 3ch ch1 dc dc ch1 dc would be counted as 6 stitches). Chains in the first half of the pattern are counted as increases and should be stitched into in the next row (look at the loops from the previous row, not the stitches).
There are charts below the pattern for anyone who gets lost!
Dense pattern:
Row 1: magic loop, work 12 sc onto loop, and pull closed. Put finger in centre of loop so that it does not shut completely.
Row 2: 2 dc into first 6 stitches, turn leaving rest of stitches unworked (12 stitches)
Row 3: 3 ch, *ch1, dc into next 2 stitches*, repeat *to* 4 times, ch1, dc into last stitch, turn (18 stitches)
Row 4: 3 ch, *ch1, dc2tog, 2dc in chain space*, repeat *to* 4 times, ch 1, dc into last stitch, turn (23 stitches)
Row 5: 3 ch *ch1, dc into next 4 stitches*, repeat *to* 4 times, ch 1, dc into last stitch, turn (28 stitches)
Row 6: 3 ch, *ch1, dc, dc2tog, dc, 2dc in chain space* repeat *to* 4 times, ch 1, dc into last stitch, turn (33 stitches)
Row 7: 3ch, *ch1, dc in next 6 stitches*, repeat *to* 4 times, ch 1, dc into last stitch, turn (38 stitches)
Row 8: 3 ch, *ch1, dc in next 2 stitches, dc2tog, dc in next 2 stitches, 2dc in chain space* repeat *to* 4 times, ch 1, dc into last stitch, turn (43 stitches)
Row 9: 3 ch, *ch1, dc in next 8 stitches*, repeat *to* 4 times, ch 1, dc into last stitch, turn (48 stitches)
Row 10: 3ch, *ch1, dc in next 3 stitches, dc2tog, dc in next 3 stitches, 2dc in chain space*, *to* 4 times, ch 1, dc into last stitch, turn (53 stitches)
Continue this pattern of increases as long as desired, so that:
Even row: 3ch *ch1, dc in next (even number) stitches*, repeat *to* 4 times, ch1, dc into last stitch, turn (number8 stitches)
Odd row: 3 ch *ch1, dc in next (number of dcs in last odd row +1) stitches, dc2tog, dc in next (number of dcs in last odd row +1), 2dc in chain space*, repeat *to* 4 times, ch1, dc into last stitch, turn (number3 stitches)
Mesh pattern:
Row 1 (should come after an even row): 4ch,*dc, ch over next stitch* repeat *to* until reach ch space, 2dc in chain space, ch1, repeat this pattern until reach end. Do not do 2ch in final chain space but ch1 and then 1dc in last stitch, turn
Row 2: 4ch, *dc in top of previous row's dc, ch over previous row's chain* repeat *to* until reach previous row's 2dc increase – dc in first dc, ch1 and place marker over this stitch, dc in second dc, ch1, continue *to*, repeat until reach end, ch1, dc in last stitch, turn
Row 3: 4ch, *dc in top of previous row's dc, ch over previous row's chain* repeat *to* until reach marker placed in previous row – remove and 2dc in ch space, ch1, continue *to* and increases until reach end, ch1, dc in last stitch, turn.
Repeat rows 2 and 3 until desired length. There should be 4 places where increases are occurring.
Weave in ends. Sew button at the bottom of the dense pattern, or wherever is convenient for neck width.
Charts:
This chart shows the *to* units of the dense pattern. The arrows show the direction of working.

This chart shows the changeover from the dense pattern to the mesh pattern.